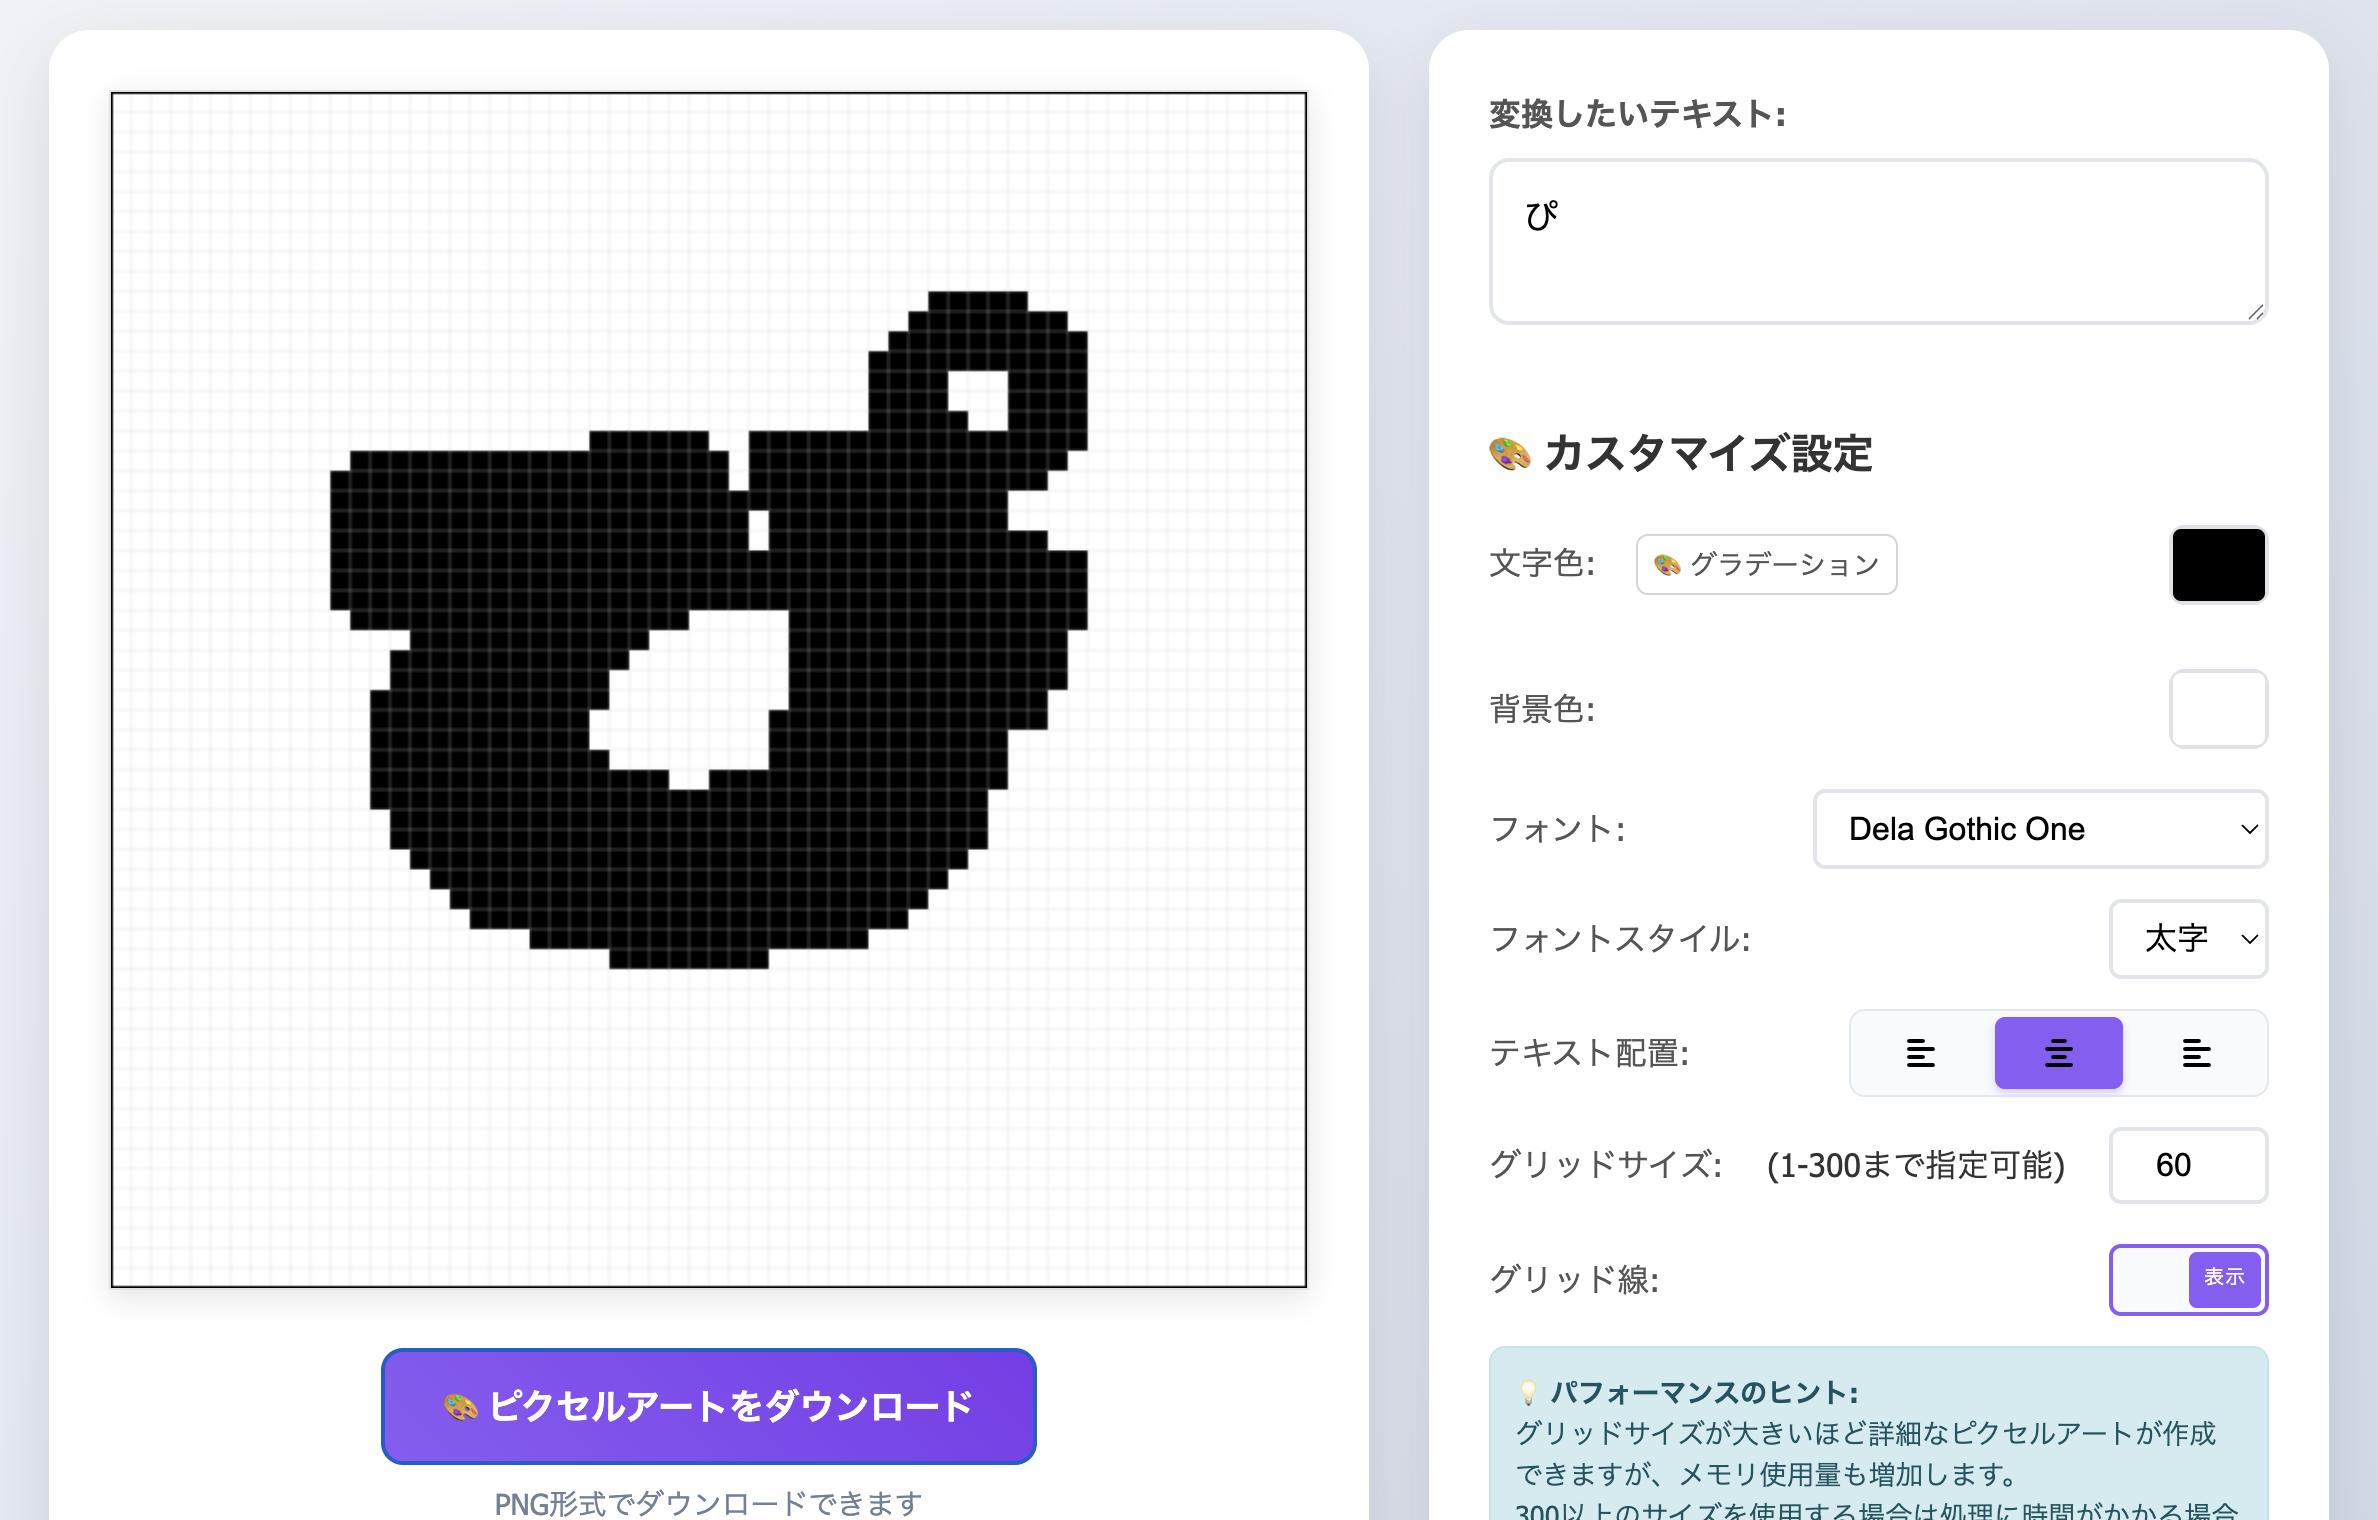
入力したテキストをレトロなピクセルアートに変換するWebアプリをHTMLで作成しました。Google Fonts対応で50種類以上の日本語フォントから選択でき、複数行入力にも対応し、グラデーションに文字色も変えられます。
ファイル構成
text-pixel-art/
├── index.html          # HTMLマークアップ
├── style.css           # CSSスタイル・レスポンシブデザイン
└── script.js           # ピクセルアート生成ロジック
技術仕様
-
HTML5, CSS3, Vanilla JavaScript
-
Google Fonts API(50種類以上の日本語フォント)
-
HTML5 Canvas(フォントベースピクセル化)
-
Font Awesome(アイコンベースUI)
-
レスポンシブデザイン対応
使い方
基本操作
-
テキスト入力: 複数行対応のテキストエリアに変換したい文字を入力
-
フォント選択: 50種類以上のGoogle Fonts日本語フォントから選択
-
スタイル設定: 標準・太字の選択とテキスト配置(左・中央・右寄せ)
-
カラーカスタマイズ: 文字色・背景色をカラーピッカーで調整
-
グラデーション: 複数のグラデーションから選択
-
グリッド調整: 1-300の範囲でピクセル密度を設定
-
プレビュー: リアルタイムでピクセルアート生成
-
ダウンロード: 600×600ピクセルのPNG形式で保存
対応文字種
-
日本語: ひらがな・カタカナ・漢字完全対応
-
英語: 大文字・小文字・数字・記号
-
複数行: 改行を含む複数行テキスト処理
グラデーションプリセット
-
サンセット: オレンジからピンクの夕焼けグラデーション
-
オーシャン: ブルーからシアンの海洋グラデーション
-
ファイア: 赤からオレンジの炎グラデーション
-
レインボー: 虹色の6段階グラデーション
-
ネオン: グリーンからシアンのネオングラデーション
-
パープル: 藍色から紫の神秘的グラデーション
-
ゴールド: 金色から明るいオレンジの豪華グラデーション
対応フォント一覧
ゴシック体系(16種)
-
Noto Sans JP / M PLUS Rounded 1c / M PLUS 1p / M PLUS 2
-
Kosugi / Kosugi Maru / Sawarabi Gothic / Dela Gothic One
-
Zen Maru Gothic / Zen Kaku Gothic New / Murecho
-
BIZ UDPGothic / BIZ UDGothic / DotGothic16
明朝体系(7種)
-
Noto Serif JP / Sawarabi Mincho / Zen Old Mincho
-
BIZ UDPMincho / BIZ UDMincho
-
Shippori Mincho / Shippori Mincho B1
デザイン・装飾系(15種)
-
Hachi Maru Pop / Rampart One / Mochiy Pop P One / Mochiy Pop One
-
Train One / Reggae One / Rocknroll One / Stick
-
New Tegomin / Yusei Magic / Zen Antique / Zen Antique Soft
-
Palette Mosaic / WDXL Lubrifont JP N
書道・筆文字系(8種)
-
Kaisei Decol / Kaisei Opti / Kaisei HarunoUmi / Kaisei Tokumin
-
Kiwi Maru / Klee One / Shippori Antique / Shippori Antique B1
変体仮名系(5種)
-
Yuji Syuku / Yuji Boku / Yuji Mai
-
Yuji Hentaigana Akari / Yuji Hentaigana Akebono
ピクセルアートの特徴
レトロゲーム風の仕上がり
-
8-bit/16-bitゲーム時代を彷彿とさせるドット絵テキスト
-
ファミコン・ゲームボーイ世代に懐かしい表現
-
モダンなWebブラウザで楽しめるレトロ体験
様々な表現の可能性
-
日本語フォントの美しさをピクセルアートで表現
-
筆文字・書道フォントでの和風ピクセルアート
-
ポップフォントでのカラフルな作品
活用方法
-
Slackの絵文字組み込み
-
プロフィール画像やアイコン作成
-
ゲーム配信での装飾素材
-
SNS投稿用のユニークなテキストアート
実装コードのポイント解説
1. Google Fontsベースピクセル化エンジン
フォントをCanvasに描画してピクセル化する高品質アルゴリズム
JavaScript実装:
/**
 * フォントベースピクセルアート生成
 * @param {string} text - 変換対象テキスト(複数行対応)
 */
generatePixelArtFromFont(text) {
    // 一時キャンバス作成
    const tempCanvas = document.createElement('canvas');
    const tempCtx = tempCanvas.getContext('2d');

    // フォント設定(漢字対応のため大きなサイズ)
    const fontSize = Math.max(64, this.pixelSize * 8);
    const fontString = `${this.fontStyle} ${fontSize}px "${this.fontFamily}", sans-serif`;

    tempCtx.font = fontString;
    tempCtx.textAlign = 'left';
    tempCtx.textBaseline = 'middle';
    tempCtx.imageSmoothingEnabled = false;

    // 複数行テキスト処理
    const lines = text.split('\n').filter(line => line.trim().length > 0);

    // 各行のサイズ測定
    let maxWidth = 0;
    const lineMetrics = [];

    lines.forEach(line => {
        const metrics = tempCtx.measureText(line);
        lineMetrics.push({
            text: line,
            width: Math.ceil(metrics.width)
        });
        maxWidth = Math.max(maxWidth, metrics.width);
    });

    const lineHeight = fontSize * 1.2;
    const totalHeight = lines.length * lineHeight;
    const padding = Math.floor(fontSize * 0.3);

    // キャンバスサイズ設定
    tempCanvas.width = maxWidth + padding * 2;
    tempCanvas.height = totalHeight + padding * 2;

    // 背景描画
    tempCtx.fillStyle = '#FFFFFF';
    tempCtx.fillRect(0, 0, tempCanvas.width, tempCanvas.height);

    // フォント設定再適用
    tempCtx.font = fontString;
    tempCtx.textAlign = 'left';
    tempCtx.textBaseline = 'middle';
    tempCtx.imageSmoothingEnabled = false;

    // テキスト配置別描画
    tempCtx.fillStyle = '#000000';
    lines.forEach((line, index) => {
        const lineWidth = lineMetrics[index].width;
        const y = padding + (index + 0.5) * lineHeight;

        let x;
        switch (this.textAlign) {
            case 'left':
                x = padding;
                break;
            case 'center':
                x = padding + (maxWidth - lineWidth) / 2;
                break;
            case 'right':
                x = padding + maxWidth - lineWidth;
                break;
            default:
                x = padding + (maxWidth - lineWidth) / 2;
        }

        tempCtx.fillText(line, x, y);
    });

    // 画像データ取得とピクセル化
    const imageData = tempCtx.getImageData(0, 0, tempCanvas.width, tempCanvas.height);
    this.pixelizeImage(imageData, tempCanvas.width, tempCanvas.height);
}
2. ピクセル化アルゴリズム
ImageDataを解析してピクセル密度に基づく最適化された描画
JavaScript実装:
/**
 * 高品質ピクセル化処理
 * @param {ImageData} imageData - 元画像データ
 * @param {number} width - 元画像幅
 * @param {number} height - 元画像高さ
 */
pixelizeImage(imageData, width, height) {
    const data = imageData.data;
    const canvasSize = 600;
    const gridSize = this.pixelSize;
    const cellSize = canvasSize / gridSize;

    // ピクセル化データ生成
    const pixelData = this.generatePixelData(data, width, height, gridSize);

    // 表示制御フラグに応じて描画
    if (this.shouldDisplayResult) {
        this.renderToCanvas(pixelData, canvasSize, gridSize, cellSize);
    } else {
        this.pendingImageData = { pixelData, canvasSize, gridSize, cellSize };
    }
}

/**
 * ピクセル密度解析によるデータ生成
 */
generatePixelData(data, width, height, gridSize) {
    const pixelData = [];
    const sampleWidth = width / gridSize;
    const sampleHeight = height / gridSize;

    for (let py = 0; py < gridSize; py++) {
        for (let px = 0; px < gridSize; px++) {
            let blackPixels = 0;
            let totalPixels = 0;

            const startX = Math.floor(px * sampleWidth);
            const endX = Math.floor((px + 1) * sampleWidth);
            const startY = Math.floor(py * sampleHeight);
            const endY = Math.floor((py + 1) * sampleHeight);

            // 領域内のピクセル解析
            for (let y = startY; y < endY && y < height; y++) {
                for (let x = startX; x < endX && x < width; x++) {
                    const index = (y * width + x) * 4;
                    const r = data[index];
                    const g = data[index + 1];
                    const b = data[index + 2];

                    const gray = (r + g + b) / 3;
                    if (gray < 180) {
                        blackPixels++;
                    }
                    totalPixels++;
                }
            }

            // 黒ピクセル密度が20%以上で描画対象
            if (totalPixels > 0 && (blackPixels / totalPixels) > 0.2) {
                pixelData.push({ px, py });
            }
        }
    }

    return pixelData;
}
3. レスポンシブ対応
画面サイズに応じてキャンバスサイズを動的調整
JavaScript実装:
/**
 * レスポンシブキャンバス初期化
 * 画面幅に応じた最適なキャンバスサイズを計算
 */
initResponsiveCanvas() {
    const updateCanvasSize = () => {
        const viewportWidth = window.innerWidth;
        let canvasSize = 600; // デフォルトサイズ

        if (viewportWidth <= 480) {
            canvasSize = Math.min(350, viewportWidth - 70);
        } else if (viewportWidth <= 560) {
            canvasSize = Math.min(450, viewportWidth - 80);
        } else if (viewportWidth <= 600) {
            canvasSize = Math.min(500, viewportWidth - 40);
        }

        // CSSサイズを更新(横スクロール防止)
        this.canvas.style.width = canvasSize + 'px';
        this.canvas.style.height = canvasSize + 'px';
    };

    updateCanvasSize();
    window.addEventListener('resize', updateCanvasSize);
}
CSS実装:
/* 段階的レスポンシブ対応 */
@media (max-width: 600px) {
    #pixel-canvas {
        width: calc(100vw - 40px);
        height: calc(100vw - 40px);
        max-width: 500px;
        max-height: 500px;
    }
}

@media (max-width: 560px) {
    #pixel-canvas {
        width: calc(100vw - 80px);
        height: calc(100vw - 80px);
        max-width: 450px;
        max-height: 450px;
    }

    .canvas-section,
    .settings-section {
        padding: 15px;
    }
}

@media (max-width: 480px) {
    #pixel-canvas {
        width: calc(100vw - 70px);
        height: calc(100vw - 70px);
        max-width: 350px;
        max-height: 350px;
    }
}
4. グラデーションピクセル描画
グラデーションでピクセルアートを彩る機能
グラデーション定義:
// グラデーションプリセットの定義
this.gradients = {
    'none': null,
    'sunset': ['#ff9a56', '#ff6b9d'],        // サンセット
    'ocean': ['#4facfe', '#00f2fe'],         // オーシャン
    'fire': ['#ff416c', '#ff4b2b'],          // ファイア
    'rainbow': ['#ff0000', '#ff8c00', '#ffd700', '#32cd32', '#00bfff', '#8a2be2'], // レインボー
    'neon': ['#00ff88', '#00ccff'],          // ネオン
    'purple': ['#667eea', '#764ba2'],        // パープル
    'gold': ['#ffd700', '#ffb347']           // ゴールド
};
グラデーション選択UI:
/* グラデーションプリセット選択 */
.gradient-presets {
    display: grid;
    grid-template-columns: repeat(4, 1fr);
    gap: 8px;
}

.gradient-option {
    cursor: pointer;
    border: 2px solid #e5e7eb;
    border-radius: 8px;
    padding: 3px;
    transition: all 0.2s ease;
}

.gradient-option:hover {
    border-color: #8b5cf6;
    transform: translateY(-1px);
    box-shadow: 0 4px 12px rgba(139, 92, 246, 0.15);
}

.gradient-preview {
    width: 100%;
    height: 32px;
    border-radius: 4px;
}

/* 各グラデーションの視覚プレビュー */
.gradient-sunset { background: linear-gradient(45deg, #ff9a56, #ff6b9d); }
.gradient-ocean { background: linear-gradient(45deg, #4facfe, #00f2fe); }
.gradient-fire { background: linear-gradient(45deg, #ff416c, #ff4b2b); }
グラデーションピクセル描画:
/**
 * グラデーションまたは単色を適用してピクセルを描画
 */
drawPixelWithGradient(ctx, x, y, width, height, totalWidth, totalHeight) {
    if (this.selectedGradient === 'none') {
        // 単色で描画
        ctx.fillStyle = this.textColor;
        ctx.fillRect(x, y, width, height);
    } else {
        // グラデーションで描画
        const gradientColors = this.gradients[this.selectedGradient];
        if (gradientColors) {
            const gradient = ctx.createLinearGradient(0, 0, totalWidth, totalHeight);

            // 2色グラデーション
            if (gradientColors.length === 2) {
                gradient.addColorStop(0, gradientColors[0]);
                gradient.addColorStop(1, gradientColors[1]);
            } else {
                // 多色グラデーション(レインボーなど)
                gradientColors.forEach((color, index) => {
                    gradient.addColorStop(index / (gradientColors.length - 1), color);
                });
            }

            ctx.fillStyle = gradient;
            ctx.fillRect(x, y, width, height);
        }
    }
}
UI選択制御:
initGradientSelection() {
    const gradientOptions = document.querySelectorAll('.gradient-option');

    // 各グラデーションオプションにクリックイベント
    gradientOptions.forEach(option => {
        option.addEventListener('click', () => {
            // 全選択解除 → 新規選択 → 再生成
            gradientOptions.forEach(opt => opt.classList.remove('active'));
            option.classList.add('active');
            this.selectedGradient = option.dataset.gradient;

            if (document.getElementById('text-input').value.trim()) {
                this.generatePixelArt();
            }
        });
    });
}
まとめ
いろいろなフォントをドット絵にできたら面白いかと思い実装しました。
実装していくうちに、グラデーション機能が欲しくなり、copilotで追加しましたが、イマイチだったので他サイトを参考に様々なグラデーションを追加しています。
直接、ピクセルアートを編集できる機能も追加していきたいです。